Ben Weese

Testing with Postman | A Complete Guide to Automation

I decided to do a dump or a one stop shop for testing with postman. You can go through my other post or just read this one.

Testing with Postman Basics

So to get started with postman you will need your API url and whether it is a GET, POST, PUT, DELETE or various other method. Your Developer should give you documentation on what the endpoint is and how it should behave. This is not always the case but you can write some basic test.

Let’s use the good old Star Wars API for our first setup.
Testing with Postman
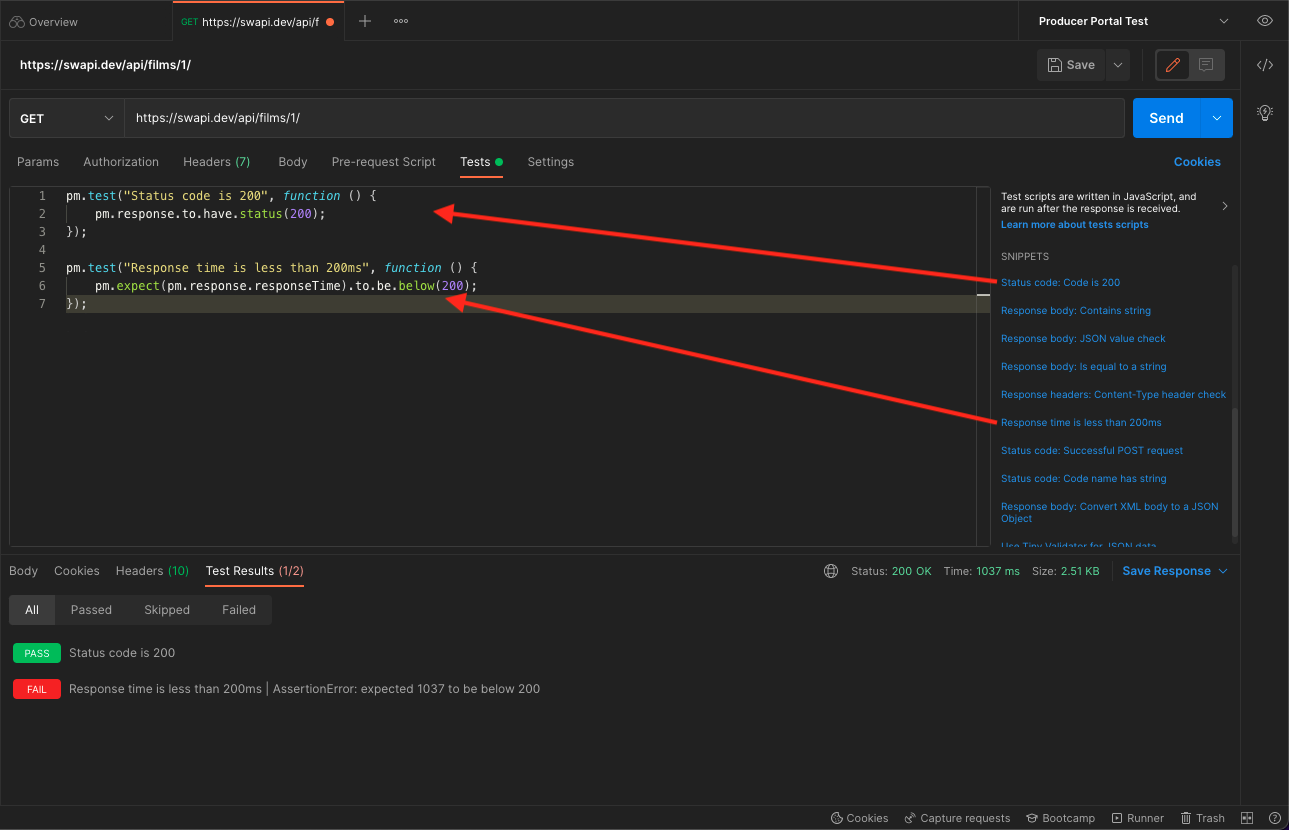
We add the URL to Postman and then a cool thing we can then add is 2 test already pre-written for us with a simple click.

This checks that the status code that comes back is a 200 which means success! For negative test cases you can replace the 200 with a 400 or what ever code you need.

pm.test("Status code is 200", function () {
    pm.response.to.have.status(200)
})


This checks that the API responded back in 200ms which is the standard time we wish the API to respond in. Sadly this test failed.

pm.test("Response time is less than 200ms", function () {
    pm.expect(pm.response.responseTime).to.be.below(200)
})


Note I took out the ;’s cause they are unnecessary.

There you have written your first test.

Setup Environmental Variable

Create an Environmental Variable for the project with the base URL as a variable called url. This allows us to use {{url}} in our calls so we can use the test one both containers.

url – http://www.example.com/api

Using Variable over other API calls

Another trick is using the environmental variable for passing variables from one API call to the next. For example we have an Encryption API.

pm.environment.set("encrypted", pm.response.text()); //Sets the variable and allows us to call it later.

//In the other API we can now use the below as a variable.
{{encrypted}}

Path Variables

One thing you can do when setting up Parameters is store the value in the environmental variable. You can also do this with Path Variables. For example you can call example.com/:variable/. :variable is a path variable and as such you can set it to be an environmental variable or anything else. You are now allowed to change it just like you would a parameter.

Adding Reusable Code to Your Variable

//Here we create a function that is then stored in the environmental variable. This is so we can then call this from any following test. This can be stored in the pre-req. of your first test in your collection.

postman.setEnvironmentVariable("commonTests", () => {
     //These are test that are ran on every call no matter if it is a positive or negative test.
     pm.test("Response time is below 300ms", function() {
          pm.expect(pm.response.responseTime).to.be.below(300)
     })

      //This is the test we want to run on all positive outcomes.
     //Email enrollment does not have a valid json by design
     var positive = (validJson = true) => {
          pm.test("Status code is 200", function() {
                    pm.response.to.have.status(200)
          })
          pm.test("Response does not error", function() {
               pm.response.to.not.be.error
               pm.response.to.not.have.jsonBody("error")
          })
          if (validJson) {
               pm.test("Response must be valid and have a body", function() {
                     pm.response.to.be.json // this assertion checks if a body exists
               });
          }     };
     //This is for our negative test that we want to fail. In Javascript we can set a default value for our incoming variable. 
     var negative = (code = 400) => {
            if (code === 400) {
                  pm.test("Status code is 400", function() {
                       pm.response.to.have.status(400)
                 })
          } else if (code === 403) {
               pm.test("Status code is 403", function() {
                    pm.response.to.have.status(403)
                })
         } else if (code === 404) {
                  pm.test("Status code is 404", function() {
                       pm.response.to.have.status(404)
                 });
        } else if (code === 500) {
               pm.test("Status code is 500", function() {
                     pm.response.to.have.status(500)
               })
       }
//This could be simpler code of below.
var negative = (code = 400) => {
                 pm.test("Status code is correct", function() {
                       pm.response.to.have.status(code)
//another test to be added
     pm.test("Reports Error", function() {
          pm.response.to.be.error
          })     }
//we return the functions so they can be used outside of the environmental variable.
     return {
          testType: {
                positive,
                negative
         }
     }
})

Using the Code in Test

//for positive test add this line to the top of your test.
eval(environment.commonTests)().testType.positive();

//for negative test add this line to the top of your test.
eval(environment.commonTests)().testType.negative(); 
//Can also use eval(environment.commonTests)().testType.negative(404); for when the code is 404

Testing for Correct Headers and PDF Responses

Below are test you can run on headers. The great thing about this is it allows us to find out if a PDF was passed as that will be in the headers.

pm.test("Headers are correct", function () {
    pm.response.to.have.header("Content-Type", 'application/pdf');
    pm.response.to.have.header("Content-Disposition");
    pm.expect(postman.getResponseHeader("Content-Disposition")).to.contain('filename="application.pdf"', 'No application.pdf was passed.')
})

Setting Up a Looping Test

You can make a request loop back to itself and run again. You can also skip test and a bunch of other things using the same setNextRequest. However for now we will be using this code to reuse the same request. Do to the nature of SetNext request you will need a setup request. Below you will find the pre-request script that creates an array and stringifys it so that we don’t get errors later when using it.

We then have a second array where we call shift. What that does is sets name to be the first name in the array and then removes the first element from the array.

So using the code below. Name becomes ‘Billy-Bob’ and the nameArray becomes [‘Jo-Bob’, ‘Jim-Bob’, ‘Bob-Bob’, ‘Bobber-Ann’].

var nameArray = ['Billy-Bob', 'Jo-Bob', 'Jim-Bob', 'Bob-Bob', 'Bobber-Ann']

pm.environment.set("nameArray", JSON.stringify(nameArray))
pm.environment.set("name", nameArray.shift())

Continuing in the same request we move to the Test tab. Here we test the 1st element of the array and then if we have more array left we shift and set the array and name to the next in the array. We then move on to the next response in line.

//Run Test
var array = pm.environment.get("nameArray")
array = JSON.parse(array)
if(array.length > 0){
    pm.environment.set("name", array.shift())
    pm.environment.set("nameArray", JSON.stringify(array))
}

The next request we can run the same test. Then we again shift the array and assign the name. Then what we can do is set the next request to be the request we are in. If we didn’t have the setup request then the pre-request would keep creating the new arrays and loop forever. Once the array has been shifted all the way through then we move on to the request following.

//Run Test
var array = pm.environment.get("nameArray")
array = JSON.parse(array)
if(array.length > 0){
    pm.environment.set("name", array.shift())
    pm.environment.set("nameArray", JSON.stringify(array))
    postman.setNextRequest("NAME OF TEST")
}

Using Chai Match Assertion

You can define a format for your response using Regex and the match assertion. Below is an example of a data format for a mysql date.

Date Format

pm.test("Date is correct format", function() {
            pm.expect(jsonData.date).to.match(/^\d{4}-\d{2}-\d{2}T\d{2}:\d{2}:\d{2}Z$/, "Date should be 0000-00-00T00:00:00Z not " + jsonData.date);
        });

Multiple Assertions

When using multiple assertions on a single data point you don’t need to create an a new pm.expect. Instead use and and a proper error message. Since a proper error message is there you will know what has happened.

And

pm.expect(jsonData.smallsString).to.be.a('string', 'smallsString is not a string')
     .and.be.lengthOf(5, 'smallsString is not 5 in length')
     .and.to.contain('den', 'smallsString does not contain den')

Creating a Date with Moment

Moment is another tool build into postman that can be used for your test. This is great for creating a rolling future, current or past date. You can add and subtract time be it minutes, hours, days, months, or years. You can also change the format to match what you need.

var moment = require('moment');

var date = moment().add(10, 'days').format('MM/DD/YYYY');
var date2 = moment().add(1, 'month').format('MM/DD/YYYY');
pm.environment.set("date", date);

Looping Arrays with Lodash

Sometimes you will want to iterate through an array. Maybe your response itself is an array. Luckily there is an easy for loop that can be used. This is use for where you see [] in the Json as that means what is in the square brackets is an array. Here we use the tool Lodash. It is already included with postman and can be called by using the _ character. If you wish to use the more recent version of Lodash you should have a

var _= require('lodash')


but this is not necessary as the earlier version works just fine.

var jsonData = pm.response.json();
//Here we go through ever piece of data and check that it matches the data type set by the API.
pm.test("Has correct schema", function() {
    //Since there will be multiple plans we want to go through each plan available.
    _.each(jsonData, (data) => {
        pm.expect(data.str).to.be.a("string", "str not a string and instead is " + data.str);
         pm.expect(data.numArray[0]).to.be.a("number", "numArray[0] not a number and instead is " + data.numArray[0]");
         pm.expect(data.numArray[1]).to.be.a("integer", "numArray[1] not a integer and instead is " + data.numArray[1]");
         pm.expect(data.bool).to.be.a("boolean", "bool not a boolean and instead is " + data.bool");
    }
});

Checking Schema

pm.test("Has correct schema", function() {
     let jsonData = pm.response.json()
     pm.expect(jsonData.str).to.be.a("string", "str not a string and instead is " + jsonData.str);
     pm.expect(jsonData.numArray[0]).to.be.a("number", "numArray[0] not a number and instead is " + jsonData.numArray[0]);
     pm.expect(jsonData.numArray[1]).to.be.a("integer", "numArray[1] not a integer and instead is " + jsonData.numArray[1]);
     pm.expect(jsonData.bool).to.be.a("boolean", "bool not a boolean and instead is " + jsonData.bool);
});

You can also output to the console if you would like something added to the log. Below are the different ways you can log to the console.

console.log(); outputs log messages to console
console.info(); outputs information messages to console
console.warn(); outputs warning messages to console
console.error(); outputs error messages to console

An example is if you are calling a string object instead of a string. There is no or in Chai so you will need to use the below code.

pm.expect(jsonData.stringObject).to.be.to.satisfy(function(s){
      return s === null || typeof s == 'string'
}, "stringObject is not a string or null")

Newman

Next is to setup a DevOps job you can go here to learn how to do that. For this section we will focus on the Execute shell and newman. With this I suggest going through Postman’s official documentation found here. This takes your postman game and ups it to be able to be leveraged with Continuous Integration.

There are 2 ways to run this and one is extraction your collections json and running newman using that file. The other takes a bit more setup but uses Postman’s API and when you updated the test they update in the cloud.

I would suggest for reports that you check out this HTML Reporter. It is created by a employee of postman and is by far the best HTML report out there in my opinion.

Links

Postman Quick Reference Guide
Chai Assertion Library
Regex Cheat Sheet
Postman: The Complete Guide on Udemy

Testing With Postman: Newman for CI/CD Pipeline

Next is to setup a DevOps job you can go here to learn how to do that. For this section we will focus on the Execute shell and newman. With this I suggest going through Postman’s official documentation found here. This takes your postman game and ups it to be able to be leveraged with Continuous Integration.

There are 2 ways to run this and one is extraction your collections json and running newman using that file. The other takes a bit more setup but uses Postman’s API and when you updated the test they update in the cloud.

I would suggest for reports that you check out this HTML Reporter. It is created by a employee of postman and is by far the best HTML report out there in my opinion.

Links

Postman Quick Reference Guide
Chai Assertion Library
Regex Cheat Sheet
Postman: The Complete Guide on Udemy
Postman Newman Documentation

Testing With Postman: Checking Schema

Schema is something you need to test to make sure when they need a string that it is indeed a string. If you google postman and schema checking you will also find a cool tool called tv4. Do not use this as it is out dated and no longer supported. Please just create a test like below. Also create the jsonData inside the test so it bombs out a single test and not the whole collection when running.

pm.test("Has correct schema", function() {
     let jsonData = pm.response.json()
     pm.expect(jsonData.str).to.be.a("string", "str not a string and instead is " + jsonData.str);
     pm.expect(jsonData.numArray[0]).to.be.a("number", "numArray[0] not a number and instead is " + jsonData.numArray[0]);
     pm.expect(jsonData.numArray[1]).to.be.a("integer", "numArray[1] not a integer and instead is " + jsonData.numArray[1]);
     pm.expect(jsonData.bool).to.be.a("boolean", "bool not a boolean and instead is " + jsonData.bool);
});

You can also output to the console if you would like something added to the log. Below are the different ways you can log to the console.

console.log(); outputs log messages to console
console.info(); outputs information messages to console
console.warn(); outputs warning messages to console
console.error(); outputs error messages to console

An example is if you are calling a string object instead of a string. There is no or in Chai so you will need to use the below code.

pm.expect(jsonData.stringObject).to.be.to.satisfy(function(s){
      return s === null || typeof s == 'string'
}, "stringObject is not a string or null")

Links

Postman Quick Reference Guide
Chai Assertion Library
Regex Cheat Sheet
Postman: The Complete Guide on Udemy

Testing with Postman: Lodash

Another javascript library built into Postman is Lodash.

Looping Arrays with Lodash

Sometimes you will want to iterate through an array. Maybe your response itself is an array. Luckily there is an easy for loop that can be used. This is use for where you see [] in the Json as that means what is in the square brackets is an array. Here we use the tool Lodash. It is already included with postman and can be called by using the _ character. If you wish to use the more recent version of Lodash you should have a

var _= require('lodash')


but this is not necessary as the earlier version works just fine.

var jsonData = pm.response.json();
//Here we go through ever piece of data and check that it matches the data type set by the API.
pm.test("Has correct schema", function() {
    //Since there will be multiple plans we want to go through each plan available.
    _.each(jsonData, (data) => {
        pm.expect(data.str).to.be.a("string", "str not a string and instead is " + data.str);
         pm.expect(data.numArray[0]).to.be.a("number", "numArray[0] not a number and instead is " + data.numArray[0]");
         pm.expect(data.numArray[1]).to.be.a("integer", "numArray[1] not a integer and instead is " + data.numArray[1]");
         pm.expect(data.bool).to.be.a("boolean", "bool not a boolean and instead is " + data.bool");
    }
});

Links

Postman Quick Reference Guide
Chai Assertion Library
Regex Cheat Sheet
Postman: The Complete Guide on Udemy

Testing with Postman: Moment

Postman has many built in Javascript libraries. Moment is one of the more useful ones for getting dates such as today’s date or tomorrow’s.

Creating a Date with Moment

Moment is another tool build into postman that can be used for your test. This is great for creating a rolling future, current or past date. You can add and subtract time be it minutes, hours, days, months, or years. You can also change the format to match what you need.

var moment = require('moment');

var date = moment().add(10, 'days').format('MM/DD/YYYY');
var date2 = moment().add(1, 'month').format('MM/DD/YYYY');
pm.environment.set("date", date);

Links

Postman Quick Reference Guide
Chai Assertion Library
Regex Cheat Sheet
Postman: The Complete Guide on Udemy

Testing with Postman: Chai Assertions

Postman uses the Chai Assertion Library so familiarize yourself with it.

Using Chai Match Assertion

You can define a format for your response using Regex and the match assertion. Below is an example of a data format for a mysql date.

Date Format

pm.test("Date is correct format", function() {
            pm.expect(jsonData.date).to.match(/^\\d{4}-\\d{2}-\\d{2}T\\d{2}:\\d{2}:\\d{2}Z$/, "Date should be 0000-00-00T00:00:00Z not " + jsonData.date);
        });

Multiple Assertions

When using multiple assertions on a single data point you don’t need to create an a new pm.expect. Instead use and and a proper error message. Since a proper error message is there you will know what has happened.

And

pm.expect(jsonData.smallsString).to.be.a('string', 'smallsString is not a string')
     .and.be.lengthOf(5, 'smallsString is not 5 in length')
     .and.to.contain('den', 'smallsString does not contain den')

See the below Chai Assertion Library link for more on Chai Assertions.

Links

Postman Quick Reference Guide
Chai Assertion Library
Regex Cheat Sheet
Postman: The Complete Guide on Udemy

Testing with Postman: Looping Test

In this blog we use setNextRequest to call to back to the same postman request. This allows us to reuse that request and change different variables for multiple test.

Setting Up a Looping Test

You can make a request loop back to itself and run again. You can also skip test and a bunch of other things using the same setNextRequest. However for now we will be using this code to reuse the same request. Do to the nature of SetNext request you will need a setup request. Below you will find the pre-request script that creates an array and stringifys it so that we don’t get errors later when using it.

We then have a second array where we call shift. What that does is sets name to be the first name in the array and then removes the first element from the array.

So using the code below. Name becomes ‘Billy-Bob’ and the nameArray becomes [‘Jo-Bob’, ‘Jim-Bob’, ‘Bob-Bob’, ‘Bobber-Ann’].

var nameArray = ['Billy-Bob', 'Jo-Bob', 'Jim-Bob', 'Bob-Bob', 'Bobber-Ann']

pm.environment.set("nameArray", JSON.stringify(nameArray))
pm.environment.set("name", nameArray.shift())

Continuing in the same request we move to the Test tab. Here we test the 1st element of the array and then if we have more array left we shift and set the array and name to the next in the array. We then move on to the next response in line.

//Run Test
var array = pm.environment.get("nameArray")
array = JSON.parse(array)
if(array.length > 0){
    pm.environment.set("name", array.shift())
    pm.environment.set("nameArray", JSON.stringify(array))
}

The next request we can run the same test. Then we again shift the array and assign the name. Then what we can do is set the next request to be the request we are in. If we didn’t have the setup request then the pre-request would keep creating the new arrays and loop forever. Once the array has been shifted all the way through then we move on to the request following.

//Run Test
var array = pm.environment.get("nameArray")
array = JSON.parse(array)
if(array.length > 0){
    pm.environment.set("name", array.shift())
    pm.environment.set("nameArray", JSON.stringify(array))
    postman.setNextRequest("NAME OF TEST")
}

Links

Postman Quick Reference Guide
Chai Assertion Library
Regex Cheat Sheet
Postman: The Complete Guide on Udemy

Testing with Postman: Headers

Sometimes the only thing you need to test is a header. This is when a PDF or something else is returned. Below is how you can test a header.

Testing for Correct Headers and PDF Responses

Below are test you can run on headers. The great thing about this is it allows us to find out if a PDF was passed as that will be in the headers.

pm.test(“Headers are correct”, function () {
pm.response.to.have.header(“Content-Type”, ‘application/pdf’);
pm.response.to.have.header(“Content-Disposition”);
pm.expect(postman.getResponseHeader(“Content-Disposition”)).to.contain(‘filename=”application.pdf”‘, ‘No application.pdf was passed.’)
})

Links

Postman Quick Reference Guide
Chai Assertion Library
Regex Cheat Sheet
Postman: The Complete Guide on Udemy

Testing with Postman: Reusable Code

Since I talked about reusable code in your environmental variable last week lets see how that works this week.

Adding Reusable Code to Your Variable

//Here we create a function that is then stored in the environmental variable. This is so we can then call this from any following test. This can be stored in the pre-req. of your first test in your collection.

postman.setEnvironmentVariable("commonTests", () => {
     //These are test that are ran on every call no matter if it is a positive or negative test.
     pm.test("Response time is below 300ms", function() {
          pm.expect(pm.response.responseTime).to.be.below(300)
     })

      //This is the test we want to run on all positive outcomes.
     //Email enrollment does not have a valid json by design
     var positive = (validJson = true) => {
          pm.test("Status code is 200", function() {
                    pm.response.to.have.status(200)
          })
          pm.test("Response does not error", function() {
               pm.response.to.not.be.error
               pm.response.to.not.have.jsonBody("error")
          })
          if (validJson) {
               pm.test("Response must be valid and have a body", function() {
                     pm.response.to.be.json // this assertion checks if a body exists
               });
          }     };
     //This is for our negative test that we want to fail. In Javascript we can set a default value for our incoming variable. 
     var negative = (code = 400) => {
            if (code === 400) {
                  pm.test("Status code is 400", function() {
                       pm.response.to.have.status(400)
                 })
          } else if (code === 403) {
               pm.test("Status code is 403", function() {
                    pm.response.to.have.status(403)
                })
         } else if (code === 404) {
                  pm.test("Status code is 404", function() {
                       pm.response.to.have.status(404)
                 });
        } else if (code === 500) {
               pm.test("Status code is 500", function() {
                     pm.response.to.have.status(500)
               })
       }
//This could be simpler code of below.
var negative = (code = 400) => {
                 pm.test("Status code is correct", function() {
                       pm.response.to.have.status(code)
//another test to be added
     pm.test("Reports Error", function() {
          pm.response.to.be.error
          })     }
//we return the functions so they can be used outside of the environmental variable.
     return {
          testType: {
                positive,
                negative
         }
     }
})

Using the Code in Test

//for positive test add this line to the top of your test.
eval(environment.commonTests)().testType.positive();

//for negative test add this line to the top of your test.
eval(environment.commonTests)().testType.negative(); 
//Can also use eval(environment.commonTests)().testType.negative(404); for when the code is 404

Links

Postman Quick Reference Guide
Chai Assertion Library
Regex Cheat Sheet
Postman: The Complete Guide on Udemy

Testing with Postman: Variables

Sorry it has been a while but I recently moved job and house, so life has been hectic. Next we will discuss variables. There are a lot of different variables you can use like Collection, Environmental, path, and others. The main 2 I use are Environmental so that we can have different variables for Dev, QA, Prod and any other environments there maybe.

One thing I will go over later is reusable code. You can store code in an environmental variable.

Setup Environmental Variable

Create an Environmental Variable for the project with the base URL as a variable called url. This allows us to use {{url}} in our calls so we can use the test one both containers.

url – http://www.example.com/api

Using Variable over other API calls

Another trick is using the environmental variable for passing variables from one API call to the next. For example we have an Encryption API.

pm.environment.set("encrypted", pm.response.text()); //Sets the variable and allows us to call it later.

//In the other API we can now use the below as a variable.
{{encrypted}}

Path Variables

One thing you can do when setting up Parameters is store the value in the environmental variable. You can also do this with Path Variables. For example you can call example.com/:variable/. :variable is a path variable and as such you can set it to be an environmental variable or anything else. You are now allowed to change it just like you would a parameter.

Links

Postman Quick Reference Guide
Chai Assertion Library
Regex Cheat Sheet
Postman: The Complete Guide on Udemy