Ben Weese

Adding Playwright Agents: Lessons from the Deep Trenches

I have spent the last few weeks adding AI agents to my Playwright framework. Specifically Playwright’s planner, generator, and healer, running locally through Claude Code. The Playwright agents explore the UI of our payment platform and write tests that match the framework I’ve been building for three years. This post is a brain dump on what worked, what didn’t, the token costs, and what I’m changing next. I am writing it mostly so I don’t forget. If anyone else is heading down this road, hopefully it saves you a step.

The Setup

The three agents are Playwright’s own. See playwright.dev/docs/test-agents.

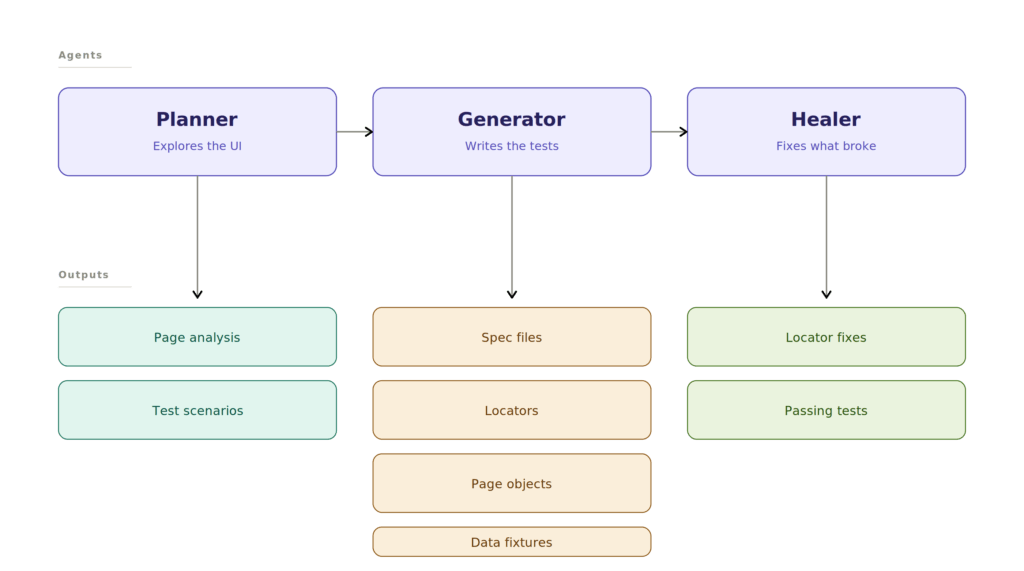
  • The Planner. Explores the UI, documents components and locators, produces a test plan.
  • The Generator. Takes the plan and writes the actual Playwright tests.
  • The Healer. Runs the generated tests, identifies failures, fixes them.

Starting With MCP, And Abandoning It Fast

My first approach was MCP. Claude Code told me Playwright agents only worked through MCP and that playwright-cli did not support agents. But I watched Playwright’s own YouTube video on MCP vs CLI and the Lie Detector Determined That Was a Lie.

Playwright agents support playwright-cli directly. The video specifically called out that the CLI is built for agents and is dramatically less token hungry than MCP. The benchmark Playwright showed on screen was 114k tokens versus 27k tokens for the same task. That works out to roughly 57% versus 13.5% of Claude’s 5 hour window, which lines up with what I saw in my own runs.

If you are running agents against a Playwright framework and you have not looked at playwright-cli yet, go read this article by Anirban first. The short version. playwright-cli snapshot gives the agent a compact structured view of the live page for around 150 tokens, instead of the agent reading source files and guessing what the DOM looks like.

How I Set the Project Up

Before running anything, I had Claude learn the codebase. After it had context, I had it generate a CLAUDE.md file documenting the framework. It did a good job. Then I had it rewrite the Playwright-provided agent definitions to use CLAUDE.md as context. That single change improved both the planner and generator output a lot.

I also generated an AI.md to document the toolchain itself. How the agents are invoked, the slash commands, the file layout, the auth flow. About 5 corrections needed but otherwise solid as a reference doc for the team.

The playwright-cli --skills command was run after install as part of Playwright’s documented setup. The agents had local command docs from the start because of that.

Running the Pipeline, And What It Cost

Here is what running all three agents actually cost on basic Claude Code, not enterprise:

AgentToken UsageTokensNotes
Planner78%156kBurned most of the 5-hour window solo
Generator39%78kRun in the next window
Healer46%93kLongest wall-clock time, less tokens than expected
Generator + Healer combined85%170kNear the window limit
Playwright agents

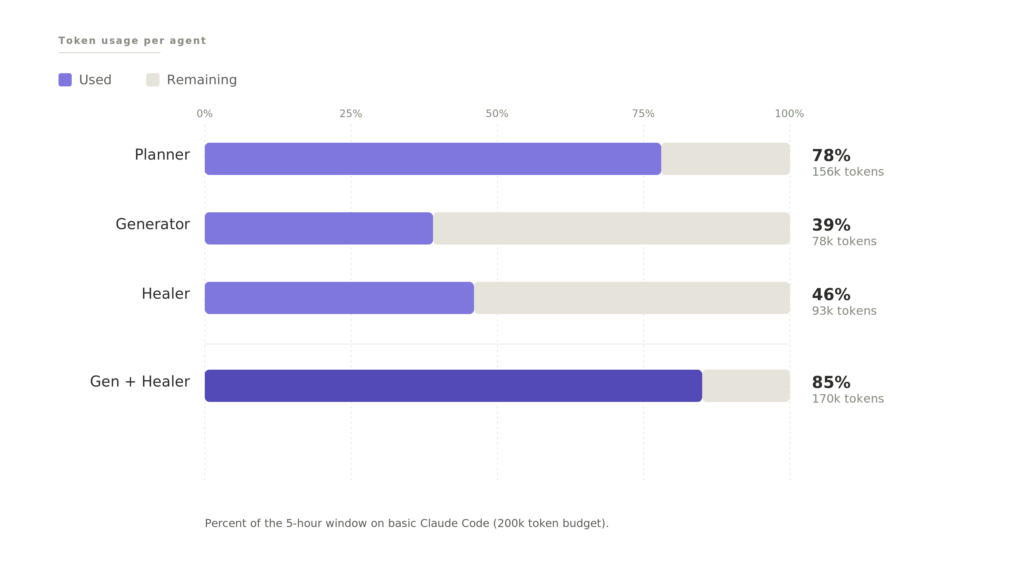
Using basic Claude Code, not the enterprise tier, I ran through 78% of my 5-hour usage on the planner alone. That meant waiting for the window to reset before running the generator and healer. What should have been one run turned into a full day.

The healer surprised me. It ran for over an hour but used less tokens than the planner. Makes sense in hindsight. The planner is doing complex analysis. Exploring the UI, documenting components, generating scenarios. The healer is doing tedious repetitive work. Run test, read failure, fix locator, repeat. Repetitive is cheaper than complex.

The Results

The generator produced 47 tests. 18 of them failed when I ran them. 29 passed.

Then I ran the healer.

After the healer finished, 45 tests were green. 2 of the 47 had been flagged as bugs along the way.

The 2 flagged bugs were not real. The agents flagged validation that only triggers after clicking the Apply button, not before. That is a design decision in our framework, not a defect. The agents did not have context on that. Something to address in the planner prompt going forward.

So 47 passing tests, 0 real bugs missed. Looks great on paper.

Then I reviewed the code.

Notes on the Planner

The planner is based on Playwright’s official planner. Modified to understand my codebase through CLAUDE.md. It does two things in one pass.

First, it analyzes the page. What is on the page, how the elements work, what options each element has, file references, and locators. On this run it produced a 936-line markdown file. Thorough.

Second, it generates test scenarios from that analysis.

A few problems came up.

  • Some of the locators it captured were too generic and needed the healer to clean up later
  • The agents needed to run through the project’s uiSetup to ensure they were logged in. Once I told the agent about uiSetup, it added the handling automatically, including login refresh logic for long runs
  • A handful of the generator’s assumptions were understandable but wrong, which I will get to below

The bigger architectural thought. The two things the planner does do not need to happen in the same agent run. The page analysis and the test scenarios are different artifacts with different lifespans. The page analysis is reusable, since the page does not change every day, and a cached version could feed future scenario generation at a fraction of the tokens. The test scenarios are throwaway after the tests exist. However this is just a theory of mine and has yet to be verified.

Notes on the Generator

The CLAUDE.md context carried over to the generator and it understood the framework. playwright-cli --skills ships with a built-in test generation skill that helped here.

The generator wrote tests, page objects, locator files, and data fixtures following the framework’s conventions. The first impression was strong.

One real problem. The generator always creates a new spec file. It knew which files to reference when building tests, but it never checked whether a similar test already existed or whether it should insert into an existing spec. Every run produces a new file. That is going to create duplicates fast. This needs to be fixed before the agents run in any kind of automated way.

Notes on the Healer

Watching the healer work was satisfying. It runs the test, sees the failure, opens a playwright-cli session, inspects the UI, and repairs the broken locator. Then runs again. Most of what it fixed was locators from the generator that probably did match the DOM but were flaky or not unique enough.

Two things I am changing about how the healer runs.

First, scope. Right now the healer can end up running the full suite to triage one failing test. The article by Anirban covers exactly this. Use --grep to scope test runs to the specific failure, and use --reporter=json so the agent parses structured output instead of pattern-matching terminal text. Same fix, way cheaper.

Second, guardrails. I read a story recently, and I cannot find the source, where someone’s AI healer “fixed” a failing test by injecting JavaScript into the UI to make the bug disappear. Not by fixing the test. Not by flagging the bug. By hiding it. The test passed. The bug was still there.

I have not seen my healer do this. But “the AI healed the test” can mean a lot of different things and I want to be very clear about what mine is and is not allowed to do.

Notes on the Generated Code

The page I was testing auto-applies last-month date filters through the URL. The generator wrongly assumed it had to calculate the date range and append the parameters to the URL itself, instead of just navigating to the page and letting it do its thing. It did extra work to arrive at the same place, which is a very AI mistake to make.

The locators are great after the heal. That part works.

The data fixture has some useless code that needs refactoring. I am chalking that up to a product knowledge gap. As we build out more skills and markdown context, that should improve.

Some of the future-date logic in the fixtures is static when it should be dynamic. In 4 years the code would not work. Then again, why would you be running this code 4 years from now? coughs in COBOL

Then the big one.

The tests are supposed to validate filters. The generated pattern is:

  1. Set the filter in the UI
  2. The UI updates the URL to match the filter
  3. The test verifies the URL contains the filter
  4. The test verifies the table is present

That is it.

The test does not verify that the contents of the table actually match the filter. Some of the tests do not even validate what filter was set. There are no locators for the table the filter is supposed to be filtering.

Concrete example. If I set the filter to September 9, 1947*, the test only checks that the URL includes the date. It never checks that the table on the page is showing entries from that date. The test passes. The filter could be returning every record from the Cretaceous period and the test would still go green. We would have a wall of passing tests guarding nothing. That is worse than no tests at all, because at least with no tests you know what you do not have.

*September 9, 1947

So Whose Fault Is This?

When I went back to the planner output, the planner never planned for the tests to check anything beyond the URL. The generator did exactly what the plan said.

So is this a planning failure or a prompt failure on my end?

It is on me. I expected the planner to be capable of more than what it was based on what I had heard from the community. The tests are lacking, and we will need to be more thorough with our prompts.

That is the lesson for anyone else heading down this road. AI agents will do exactly what you ask. They will not infer what “good test coverage” means. “Test the filters” is not a complete prompt. “Test that the filter changes the URL AND that the table updates to match the filter criteria” is closer to the bar.

What I Am Changing Next

Going forward.

Split the planner workflow. The planner creates two things, a page analysis and a set of test scenarios. Those can be split. The generator runs after the planner, against both files, and produces the locators.js file. Once the generator is done, I can go back to the page analysis and insert a reference to the locator file. The test scenarios can be deleted once the tests are generated. The page analysis sticks around for reuse on future runs against the same page.

Teach the generator about existing spec files. No more always-create-new-spec behavior. It needs to check whether a relevant spec exists and insert into it.

Implement Anirban’s --grep and --reporter=json patterns for the healer. Scope every healer run. No more full-suite triage for one failing test.

Write better prompts. Specifically for the planner. The “table contents must match the filter” problem is not solvable by the agent figuring it out. It has to be told.

The Real Bottleneck

I keep reading articles and Reddit threads making the same point and I think they are right. AI moves the bottleneck, it does not remove it. Code generation is faster. Code review is the same speed it always was. Maybe slower, because now you are reviewing code you did not write and do not have the same mental model of.

With this run of the agents, 47 generated tests need to be reviewed. The 936-line page analysis needs to be reviewed. The healer’s locator fixes need to be reviewed. The agent definitions need to be reviewed. The auto-generated CLAUDE.md needs to be reviewed. None of it can be skipped, especially in a payment platform where a test that passes when it should not is actively dangerous.

The time I saved generating tests, I am spending reviewing them. That is the price of delegating to AI.

I have worked using AI for over a year and I have yet to see real time-saving benefits. Before skills, it was arguing with AI on best code practices and correcting it. Now it is reviewing code and writing better markdown files for it. AI is like my 7 year old daughter. Highly intelligent but inexperienced and needs its hand held.

Links

Testing with Postman | A Complete Guide to Automation

I decided to do a dump or a one stop shop for testing with postman. You can go through my other post or just read this one.

Testing with Postman Basics

So to get started with postman you will need your API url and whether it is a GET, POST, PUT, DELETE or various other method. Your Developer should give you documentation on what the endpoint is and how it should behave. This is not always the case but you can write some basic test.

Let’s use the good old Star Wars API for our first setup.
Testing with Postman
We add the URL to Postman and then a cool thing we can then add is 2 test already pre-written for us with a simple click.

This checks that the status code that comes back is a 200 which means success! For negative test cases you can replace the 200 with a 400 or what ever code you need.

pm.test("Status code is 200", function () {
    pm.response.to.have.status(200)
})


This checks that the API responded back in 200ms which is the standard time we wish the API to respond in. Sadly this test failed.

pm.test("Response time is less than 200ms", function () {
    pm.expect(pm.response.responseTime).to.be.below(200)
})


Note I took out the ;’s cause they are unnecessary.

There you have written your first test.

Setup Environmental Variable

Create an Environmental Variable for the project with the base URL as a variable called url. This allows us to use {{url}} in our calls so we can use the test one both containers.

url – http://www.example.com/api

Using Variable over other API calls

Another trick is using the environmental variable for passing variables from one API call to the next. For example we have an Encryption API.

pm.environment.set("encrypted", pm.response.text()); //Sets the variable and allows us to call it later.

//In the other API we can now use the below as a variable.
{{encrypted}}

Path Variables

One thing you can do when setting up Parameters is store the value in the environmental variable. You can also do this with Path Variables. For example you can call example.com/:variable/. :variable is a path variable and as such you can set it to be an environmental variable or anything else. You are now allowed to change it just like you would a parameter.

Adding Reusable Code to Your Variable

//Here we create a function that is then stored in the environmental variable. This is so we can then call this from any following test. This can be stored in the pre-req. of your first test in your collection.

postman.setEnvironmentVariable("commonTests", () => {
     //These are test that are ran on every call no matter if it is a positive or negative test.
     pm.test("Response time is below 300ms", function() {
          pm.expect(pm.response.responseTime).to.be.below(300)
     })

      //This is the test we want to run on all positive outcomes.
     //Email enrollment does not have a valid json by design
     var positive = (validJson = true) => {
          pm.test("Status code is 200", function() {
                    pm.response.to.have.status(200)
          })
          pm.test("Response does not error", function() {
               pm.response.to.not.be.error
               pm.response.to.not.have.jsonBody("error")
          })
          if (validJson) {
               pm.test("Response must be valid and have a body", function() {
                     pm.response.to.be.json // this assertion checks if a body exists
               });
          }     };
     //This is for our negative test that we want to fail. In Javascript we can set a default value for our incoming variable. 
     var negative = (code = 400) => {
            if (code === 400) {
                  pm.test("Status code is 400", function() {
                       pm.response.to.have.status(400)
                 })
          } else if (code === 403) {
               pm.test("Status code is 403", function() {
                    pm.response.to.have.status(403)
                })
         } else if (code === 404) {
                  pm.test("Status code is 404", function() {
                       pm.response.to.have.status(404)
                 });
        } else if (code === 500) {
               pm.test("Status code is 500", function() {
                     pm.response.to.have.status(500)
               })
       }
//This could be simpler code of below.
var negative = (code = 400) => {
                 pm.test("Status code is correct", function() {
                       pm.response.to.have.status(code)
//another test to be added
     pm.test("Reports Error", function() {
          pm.response.to.be.error
          })     }
//we return the functions so they can be used outside of the environmental variable.
     return {
          testType: {
                positive,
                negative
         }
     }
})

Using the Code in Test

//for positive test add this line to the top of your test.
eval(environment.commonTests)().testType.positive();

//for negative test add this line to the top of your test.
eval(environment.commonTests)().testType.negative(); 
//Can also use eval(environment.commonTests)().testType.negative(404); for when the code is 404

Testing for Correct Headers and PDF Responses

Below are test you can run on headers. The great thing about this is it allows us to find out if a PDF was passed as that will be in the headers.

pm.test("Headers are correct", function () {
    pm.response.to.have.header("Content-Type", 'application/pdf');
    pm.response.to.have.header("Content-Disposition");
    pm.expect(postman.getResponseHeader("Content-Disposition")).to.contain('filename="application.pdf"', 'No application.pdf was passed.')
})

Setting Up a Looping Test

You can make a request loop back to itself and run again. You can also skip test and a bunch of other things using the same setNextRequest. However for now we will be using this code to reuse the same request. Do to the nature of SetNext request you will need a setup request. Below you will find the pre-request script that creates an array and stringifys it so that we don’t get errors later when using it.

We then have a second array where we call shift. What that does is sets name to be the first name in the array and then removes the first element from the array.

So using the code below. Name becomes ‘Billy-Bob’ and the nameArray becomes [‘Jo-Bob’, ‘Jim-Bob’, ‘Bob-Bob’, ‘Bobber-Ann’].

var nameArray = ['Billy-Bob', 'Jo-Bob', 'Jim-Bob', 'Bob-Bob', 'Bobber-Ann']

pm.environment.set("nameArray", JSON.stringify(nameArray))
pm.environment.set("name", nameArray.shift())

Continuing in the same request we move to the Test tab. Here we test the 1st element of the array and then if we have more array left we shift and set the array and name to the next in the array. We then move on to the next response in line.

//Run Test
var array = pm.environment.get("nameArray")
array = JSON.parse(array)
if(array.length > 0){
    pm.environment.set("name", array.shift())
    pm.environment.set("nameArray", JSON.stringify(array))
}

The next request we can run the same test. Then we again shift the array and assign the name. Then what we can do is set the next request to be the request we are in. If we didn’t have the setup request then the pre-request would keep creating the new arrays and loop forever. Once the array has been shifted all the way through then we move on to the request following.

//Run Test
var array = pm.environment.get("nameArray")
array = JSON.parse(array)
if(array.length > 0){
    pm.environment.set("name", array.shift())
    pm.environment.set("nameArray", JSON.stringify(array))
    postman.setNextRequest("NAME OF TEST")
}

Using Chai Match Assertion

You can define a format for your response using Regex and the match assertion. Below is an example of a data format for a mysql date.

Date Format

pm.test("Date is correct format", function() {
            pm.expect(jsonData.date).to.match(/^\d{4}-\d{2}-\d{2}T\d{2}:\d{2}:\d{2}Z$/, "Date should be 0000-00-00T00:00:00Z not " + jsonData.date);
        });

Multiple Assertions

When using multiple assertions on a single data point you don’t need to create an a new pm.expect. Instead use and and a proper error message. Since a proper error message is there you will know what has happened.

And

pm.expect(jsonData.smallsString).to.be.a('string', 'smallsString is not a string')
     .and.be.lengthOf(5, 'smallsString is not 5 in length')
     .and.to.contain('den', 'smallsString does not contain den')

Creating a Date with Moment

Moment is another tool build into postman that can be used for your test. This is great for creating a rolling future, current or past date. You can add and subtract time be it minutes, hours, days, months, or years. You can also change the format to match what you need.

var moment = require('moment');

var date = moment().add(10, 'days').format('MM/DD/YYYY');
var date2 = moment().add(1, 'month').format('MM/DD/YYYY');
pm.environment.set("date", date);

Looping Arrays with Lodash

Sometimes you will want to iterate through an array. Maybe your response itself is an array. Luckily there is an easy for loop that can be used. This is use for where you see [] in the Json as that means what is in the square brackets is an array. Here we use the tool Lodash. It is already included with postman and can be called by using the _ character. If you wish to use the more recent version of Lodash you should have a

var _= require('lodash')


but this is not necessary as the earlier version works just fine.

var jsonData = pm.response.json();
//Here we go through ever piece of data and check that it matches the data type set by the API.
pm.test("Has correct schema", function() {
    //Since there will be multiple plans we want to go through each plan available.
    _.each(jsonData, (data) => {
        pm.expect(data.str).to.be.a("string", "str not a string and instead is " + data.str);
         pm.expect(data.numArray[0]).to.be.a("number", "numArray[0] not a number and instead is " + data.numArray[0]");
         pm.expect(data.numArray[1]).to.be.a("integer", "numArray[1] not a integer and instead is " + data.numArray[1]");
         pm.expect(data.bool).to.be.a("boolean", "bool not a boolean and instead is " + data.bool");
    }
});

Checking Schema

pm.test("Has correct schema", function() {
     let jsonData = pm.response.json()
     pm.expect(jsonData.str).to.be.a("string", "str not a string and instead is " + jsonData.str);
     pm.expect(jsonData.numArray[0]).to.be.a("number", "numArray[0] not a number and instead is " + jsonData.numArray[0]);
     pm.expect(jsonData.numArray[1]).to.be.a("integer", "numArray[1] not a integer and instead is " + jsonData.numArray[1]);
     pm.expect(jsonData.bool).to.be.a("boolean", "bool not a boolean and instead is " + jsonData.bool);
});

You can also output to the console if you would like something added to the log. Below are the different ways you can log to the console.

console.log(); outputs log messages to console
console.info(); outputs information messages to console
console.warn(); outputs warning messages to console
console.error(); outputs error messages to console

An example is if you are calling a string object instead of a string. There is no or in Chai so you will need to use the below code.

pm.expect(jsonData.stringObject).to.be.to.satisfy(function(s){
      return s === null || typeof s == 'string'
}, "stringObject is not a string or null")

Newman

Next is to setup a DevOps job you can go here to learn how to do that. For this section we will focus on the Execute shell and newman. With this I suggest going through Postman’s official documentation found here. This takes your postman game and ups it to be able to be leveraged with Continuous Integration.

There are 2 ways to run this and one is extraction your collections json and running newman using that file. The other takes a bit more setup but uses Postman’s API and when you updated the test they update in the cloud.

I would suggest for reports that you check out this HTML Reporter. It is created by a employee of postman and is by far the best HTML report out there in my opinion.

Links

Postman Quick Reference Guide
Chai Assertion Library
Regex Cheat Sheet
Postman: The Complete Guide on Udemy

Testing With Postman: Newman for CI/CD Pipeline

Next is to setup a DevOps job you can go here to learn how to do that. For this section we will focus on the Execute shell and newman. With this I suggest going through Postman’s official documentation found here. This takes your postman game and ups it to be able to be leveraged with Continuous Integration.

There are 2 ways to run this and one is extraction your collections json and running newman using that file. The other takes a bit more setup but uses Postman’s API and when you updated the test they update in the cloud.

I would suggest for reports that you check out this HTML Reporter. It is created by a employee of postman and is by far the best HTML report out there in my opinion.

Links

Postman Quick Reference Guide
Chai Assertion Library
Regex Cheat Sheet
Postman: The Complete Guide on Udemy
Postman Newman Documentation

Testing With Postman: Checking Schema

Schema is something you need to test to make sure when they need a string that it is indeed a string. If you google postman and schema checking you will also find a cool tool called tv4. Do not use this as it is out dated and no longer supported. Please just create a test like below. Also create the jsonData inside the test so it bombs out a single test and not the whole collection when running.

pm.test("Has correct schema", function() {
     let jsonData = pm.response.json()
     pm.expect(jsonData.str).to.be.a("string", "str not a string and instead is " + jsonData.str);
     pm.expect(jsonData.numArray[0]).to.be.a("number", "numArray[0] not a number and instead is " + jsonData.numArray[0]);
     pm.expect(jsonData.numArray[1]).to.be.a("integer", "numArray[1] not a integer and instead is " + jsonData.numArray[1]);
     pm.expect(jsonData.bool).to.be.a("boolean", "bool not a boolean and instead is " + jsonData.bool);
});

You can also output to the console if you would like something added to the log. Below are the different ways you can log to the console.

console.log(); outputs log messages to console
console.info(); outputs information messages to console
console.warn(); outputs warning messages to console
console.error(); outputs error messages to console

An example is if you are calling a string object instead of a string. There is no or in Chai so you will need to use the below code.

pm.expect(jsonData.stringObject).to.be.to.satisfy(function(s){
      return s === null || typeof s == 'string'
}, "stringObject is not a string or null")

Links

Postman Quick Reference Guide
Chai Assertion Library
Regex Cheat Sheet
Postman: The Complete Guide on Udemy

Testing with Postman: Lodash

Another javascript library built into Postman is Lodash.

Looping Arrays with Lodash

Sometimes you will want to iterate through an array. Maybe your response itself is an array. Luckily there is an easy for loop that can be used. This is use for where you see [] in the Json as that means what is in the square brackets is an array. Here we use the tool Lodash. It is already included with postman and can be called by using the _ character. If you wish to use the more recent version of Lodash you should have a

var _= require('lodash')


but this is not necessary as the earlier version works just fine.

var jsonData = pm.response.json();
//Here we go through ever piece of data and check that it matches the data type set by the API.
pm.test("Has correct schema", function() {
    //Since there will be multiple plans we want to go through each plan available.
    _.each(jsonData, (data) => {
        pm.expect(data.str).to.be.a("string", "str not a string and instead is " + data.str);
         pm.expect(data.numArray[0]).to.be.a("number", "numArray[0] not a number and instead is " + data.numArray[0]");
         pm.expect(data.numArray[1]).to.be.a("integer", "numArray[1] not a integer and instead is " + data.numArray[1]");
         pm.expect(data.bool).to.be.a("boolean", "bool not a boolean and instead is " + data.bool");
    }
});

Links

Postman Quick Reference Guide
Chai Assertion Library
Regex Cheat Sheet
Postman: The Complete Guide on Udemy

Testing with Postman: Moment

Postman has many built in Javascript libraries. Moment is one of the more useful ones for getting dates such as today’s date or tomorrow’s.

Creating a Date with Moment

Moment is another tool build into postman that can be used for your test. This is great for creating a rolling future, current or past date. You can add and subtract time be it minutes, hours, days, months, or years. You can also change the format to match what you need.

var moment = require('moment');

var date = moment().add(10, 'days').format('MM/DD/YYYY');
var date2 = moment().add(1, 'month').format('MM/DD/YYYY');
pm.environment.set("date", date);

Links

Postman Quick Reference Guide
Chai Assertion Library
Regex Cheat Sheet
Postman: The Complete Guide on Udemy

Testing with Postman: Chai Assertions

Postman uses the Chai Assertion Library so familiarize yourself with it.

Using Chai Match Assertion

You can define a format for your response using Regex and the match assertion. Below is an example of a data format for a mysql date.

Date Format

pm.test("Date is correct format", function() {
            pm.expect(jsonData.date).to.match(/^\\d{4}-\\d{2}-\\d{2}T\\d{2}:\\d{2}:\\d{2}Z$/, "Date should be 0000-00-00T00:00:00Z not " + jsonData.date);
        });

Multiple Assertions

When using multiple assertions on a single data point you don’t need to create an a new pm.expect. Instead use and and a proper error message. Since a proper error message is there you will know what has happened.

And

pm.expect(jsonData.smallsString).to.be.a('string', 'smallsString is not a string')
     .and.be.lengthOf(5, 'smallsString is not 5 in length')
     .and.to.contain('den', 'smallsString does not contain den')

See the below Chai Assertion Library link for more on Chai Assertions.

Links

Postman Quick Reference Guide
Chai Assertion Library
Regex Cheat Sheet
Postman: The Complete Guide on Udemy

Testing with Postman: Looping Test

In this blog we use setNextRequest to call to back to the same postman request. This allows us to reuse that request and change different variables for multiple test.

Setting Up a Looping Test

You can make a request loop back to itself and run again. You can also skip test and a bunch of other things using the same setNextRequest. However for now we will be using this code to reuse the same request. Do to the nature of SetNext request you will need a setup request. Below you will find the pre-request script that creates an array and stringifys it so that we don’t get errors later when using it.

We then have a second array where we call shift. What that does is sets name to be the first name in the array and then removes the first element from the array.

So using the code below. Name becomes ‘Billy-Bob’ and the nameArray becomes [‘Jo-Bob’, ‘Jim-Bob’, ‘Bob-Bob’, ‘Bobber-Ann’].

var nameArray = ['Billy-Bob', 'Jo-Bob', 'Jim-Bob', 'Bob-Bob', 'Bobber-Ann']

pm.environment.set("nameArray", JSON.stringify(nameArray))
pm.environment.set("name", nameArray.shift())

Continuing in the same request we move to the Test tab. Here we test the 1st element of the array and then if we have more array left we shift and set the array and name to the next in the array. We then move on to the next response in line.

//Run Test
var array = pm.environment.get("nameArray")
array = JSON.parse(array)
if(array.length > 0){
    pm.environment.set("name", array.shift())
    pm.environment.set("nameArray", JSON.stringify(array))
}

The next request we can run the same test. Then we again shift the array and assign the name. Then what we can do is set the next request to be the request we are in. If we didn’t have the setup request then the pre-request would keep creating the new arrays and loop forever. Once the array has been shifted all the way through then we move on to the request following.

//Run Test
var array = pm.environment.get("nameArray")
array = JSON.parse(array)
if(array.length > 0){
    pm.environment.set("name", array.shift())
    pm.environment.set("nameArray", JSON.stringify(array))
    postman.setNextRequest("NAME OF TEST")
}

Links

Postman Quick Reference Guide
Chai Assertion Library
Regex Cheat Sheet
Postman: The Complete Guide on Udemy

Testing with Postman: Headers

Sometimes the only thing you need to test is a header. This is when a PDF or something else is returned. Below is how you can test a header.

Testing for Correct Headers and PDF Responses

Below are test you can run on headers. The great thing about this is it allows us to find out if a PDF was passed as that will be in the headers.

pm.test(“Headers are correct”, function () {
pm.response.to.have.header(“Content-Type”, ‘application/pdf’);
pm.response.to.have.header(“Content-Disposition”);
pm.expect(postman.getResponseHeader(“Content-Disposition”)).to.contain(‘filename=”application.pdf”‘, ‘No application.pdf was passed.’)
})

Links

Postman Quick Reference Guide
Chai Assertion Library
Regex Cheat Sheet
Postman: The Complete Guide on Udemy

Testing with Postman: Reusable Code

Since I talked about reusable code in your environmental variable last week lets see how that works this week.

Adding Reusable Code to Your Variable

//Here we create a function that is then stored in the environmental variable. This is so we can then call this from any following test. This can be stored in the pre-req. of your first test in your collection.

postman.setEnvironmentVariable("commonTests", () => {
     //These are test that are ran on every call no matter if it is a positive or negative test.
     pm.test("Response time is below 300ms", function() {
          pm.expect(pm.response.responseTime).to.be.below(300)
     })

      //This is the test we want to run on all positive outcomes.
     //Email enrollment does not have a valid json by design
     var positive = (validJson = true) => {
          pm.test("Status code is 200", function() {
                    pm.response.to.have.status(200)
          })
          pm.test("Response does not error", function() {
               pm.response.to.not.be.error
               pm.response.to.not.have.jsonBody("error")
          })
          if (validJson) {
               pm.test("Response must be valid and have a body", function() {
                     pm.response.to.be.json // this assertion checks if a body exists
               });
          }     };
     //This is for our negative test that we want to fail. In Javascript we can set a default value for our incoming variable. 
     var negative = (code = 400) => {
            if (code === 400) {
                  pm.test("Status code is 400", function() {
                       pm.response.to.have.status(400)
                 })
          } else if (code === 403) {
               pm.test("Status code is 403", function() {
                    pm.response.to.have.status(403)
                })
         } else if (code === 404) {
                  pm.test("Status code is 404", function() {
                       pm.response.to.have.status(404)
                 });
        } else if (code === 500) {
               pm.test("Status code is 500", function() {
                     pm.response.to.have.status(500)
               })
       }
//This could be simpler code of below.
var negative = (code = 400) => {
                 pm.test("Status code is correct", function() {
                       pm.response.to.have.status(code)
//another test to be added
     pm.test("Reports Error", function() {
          pm.response.to.be.error
          })     }
//we return the functions so they can be used outside of the environmental variable.
     return {
          testType: {
                positive,
                negative
         }
     }
})

Using the Code in Test

//for positive test add this line to the top of your test.
eval(environment.commonTests)().testType.positive();

//for negative test add this line to the top of your test.
eval(environment.commonTests)().testType.negative(); 
//Can also use eval(environment.commonTests)().testType.negative(404); for when the code is 404

Links

Postman Quick Reference Guide
Chai Assertion Library
Regex Cheat Sheet
Postman: The Complete Guide on Udemy