

Testing with Postman: Getting Started
I am writing a Postman Series to show the full extent of what a software tester can do with this tool. I spent a year learning and cultivating my Postman knowledge because at the time I wanted to show my company what I could bring to the table. I would like to think I became an expert on the subject but have seen many people downplay what postman is capable of via testing.
While we no longer use Postman, a lot of the excuses I have seen people use as reasons not to use Postman have mostly been something they didn’t know Postman could do. Postman is more capable than what most might think for automation and is not just a manual or codeless tool.
For those wondering we switched to Rest-Assured so we could store passwords in environmental variables instead of in the code for security reasons.
What is an API and why am I testing it?
Wikipedia defines an API as “An application programming interface (API) is a connection between computers or between computer programs.” Most will use it as a communication between a browser and a database stored elsewhere. Behind the prettiness that is this blog there is a lot of APIs that run. GETs, POST, PUTs, DELETEs, and many other quick calls that pull data.
Even when entering in the web address above and hitting enter, an API is calling a get and pulling down the HTML, CSS, and Javascript for the browser. When coding you want to write lots of integration test which are also known as API test. This test the communication between the website and the database. Input wrong data and the site errors. So you want your test to make sure the site doesn’t break when taking in the right or wrong inputs.
Testing Basics
So to get started with postman you will need your API url and whether it is a GET, POST, PUT, DELETE or various other method. Your Developer should give you documentation on what the endpoint is and how it should behave. This is not always the case but you can write some basic test.
Let’s use the good old Star Wars API for our first setup.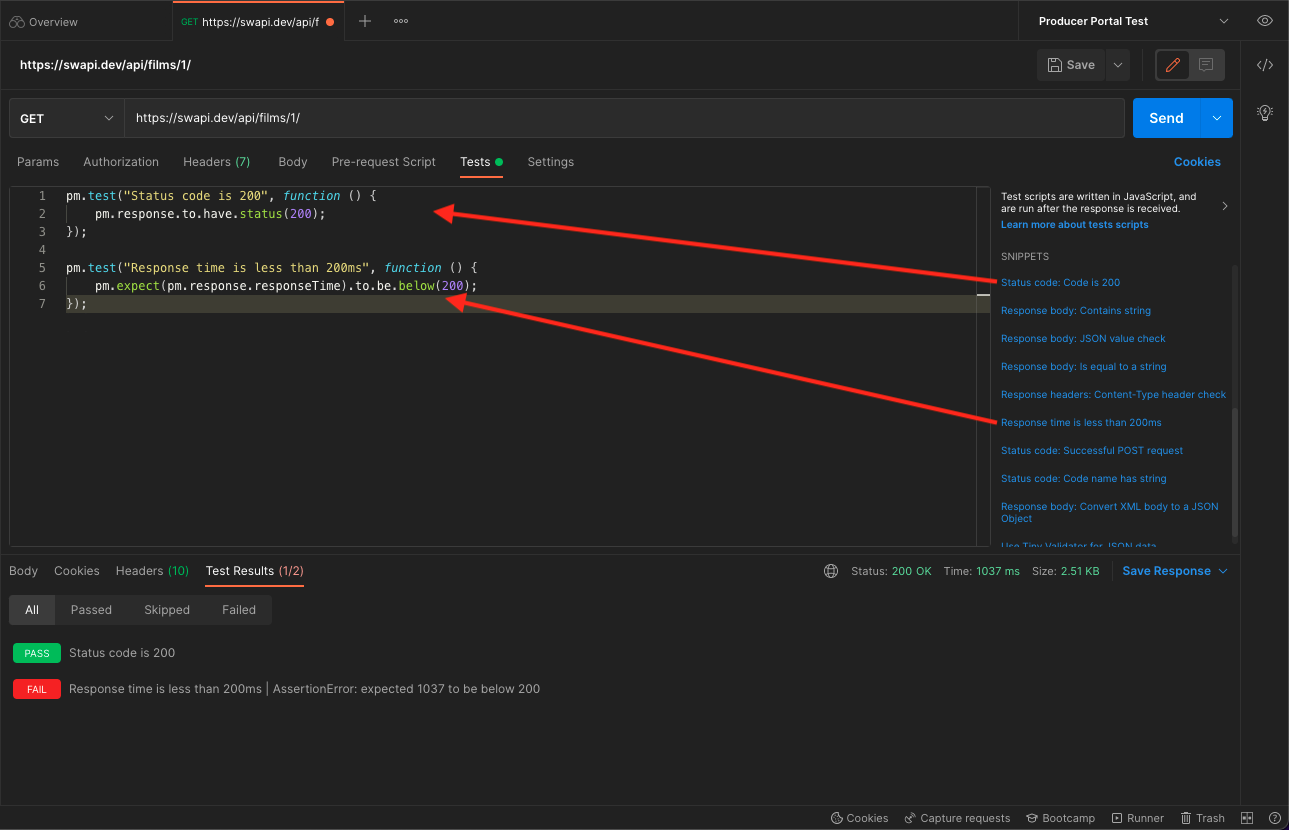 We add the URL to Postman and then a cool thing we can then add is 2 test already pre-written for us with a simple click.
This checks that the status code that comes back is a 200 which means success! For negative test cases you can replace the 200 with a 400 or what ever code you need.COPYCOPY
pm.test("Status code is 200", function () {
    pm.response.to.have.status(200)
})
This checks that the API responded back in 200ms which is the standard time we wish the API to respond in. Sadly this test failed.COPYCOPY
pm.test("Response time is less than 200ms", function () {
    pm.expect(pm.response.responseTime).to.be.below(200)
})
Note I took out the ;’s cause they are unnecessary.
There you have written your first test.
Running Your Test
You can run each API call individually but the real power is creating a collection of calls that can then run in order. You basically create a folder of your calls and they will run one right after another when you run the collection. Later we will go over how we can run our collection in CLI with Newman.